The most powerful STEAM learning robot ever. A comprehensive education toolkit and curriculum for both Scratch and Python programming is provided, and further expansion is possible with various microcontrollers and sensors.
You probably think of DJI as that drone company, but they’ve actually turned their engineering geniuses to a lot more than just drones. The DJI Robomaster EP Core is the next generation of intelligently programmable, remote-controlled, or entirely autonomous robots. It’s insanely good fun, a great learning experience, and I’m completely smitten with it.
Read on to find out more.
Robomaster EP Core: At a Glance
- Omnidirectional movement via Mecanum wheels and custom servo motors with 250Nmm torque.
- Four hit detectors (impact or laser) with RGB ring lights.
- 2-axis grabber.
- 2400mAh battery (around 1-hour battery life).
- HD camera, microphone, and onboard speaker.
- Micro-SD card slot.
- Local Wi-Fi or router connectivity.
- Proximity sensor.
- Dimensions: H13 x W10 x L15.5 inches (H33 x W25 x L39 cm) with grabber fully retracted.
- Weight: 7lbs 8oz (3.4kg).
- Expandable with Raspberry Pi, Arduino, micro:bit, or NVIDIA Jetson; sensor adaptors provided.
- FPV remote control via desktop or smartphone app.
- Scratch or Python programming.
- Curriculum and structured competitive modes.
Note: we received an engineering sample for testing. Contents and build guide may differ, and we didn’t have access to the full educational curriculum, only the existing Robomaster app (which is primarily designed for the Robomaster S1 Series).
Building the Robomaster EP Core
Before you can really get started, the Robomaster EP Core package arrives in an enormous box consisting of five trays of parts. That’s right: it’s flat-packed and you’ll need to build it yourself. That would the Engineering part of the STEAM learning experience.
It took me a good half-day of solid build time to get this put together (which you can see in the video review compressed down to about a minute!).
Thankfully the instructions are detailed, and despite two full trays of screws and bolts, each part is labeled well and at no point was I confused about where something ought to be placed.
If you can build some Ikea furniture, you can do this. Just be sure to pick the right screw from the right part of the tray.
Getting Started
You can connect to the Robomaster either via a local Wi-Fi, or by allowing the Robomaster to connect to your router. The latter is preferable, as it allows you to access the Robomaster from any networked client for truly remote control and programming.
A desktop version of the software is available for Mac or PC, though it appears to be a direct port of the mobile app, and runs full-screen.
A switch on the side of the grey controller box selects which mode to operate in. Simply type in your Wi-Fi password to the app so it can generate a QR code. The camera mounted on the Robomaster will then read this, and connect to the network.
Note that the Robomaster is unable to roam between enterprise Wi-Fi access points, so you should use a single high powered router or ensure adequate coverage in the location you’ll be operating the Robomaster. Driving down my hallway resulted in the Robomaster disconnecting from one Unifi access point and pausing for a few seconds as it reconnected through another.
Robomaster Chassis
There are two main parts to the build. The first is the wheels and chassis. We’ll talk more about the “Mecanum” wheels in a moment, but the chassis itself is built around a large solid metal frame, which includes extra mounting points for your own 3D printed parts, accessories, or additional sensors.
The front half has a slight suspension on it, allowing it to traverse small bumps with ease.
This chassis houses the battery as well as the power distribution board and communication bus. It’s this that you’ll plug everything in to. The battery is removable, and spares can be purchased. Each charge lasted me about an hour of constant use.
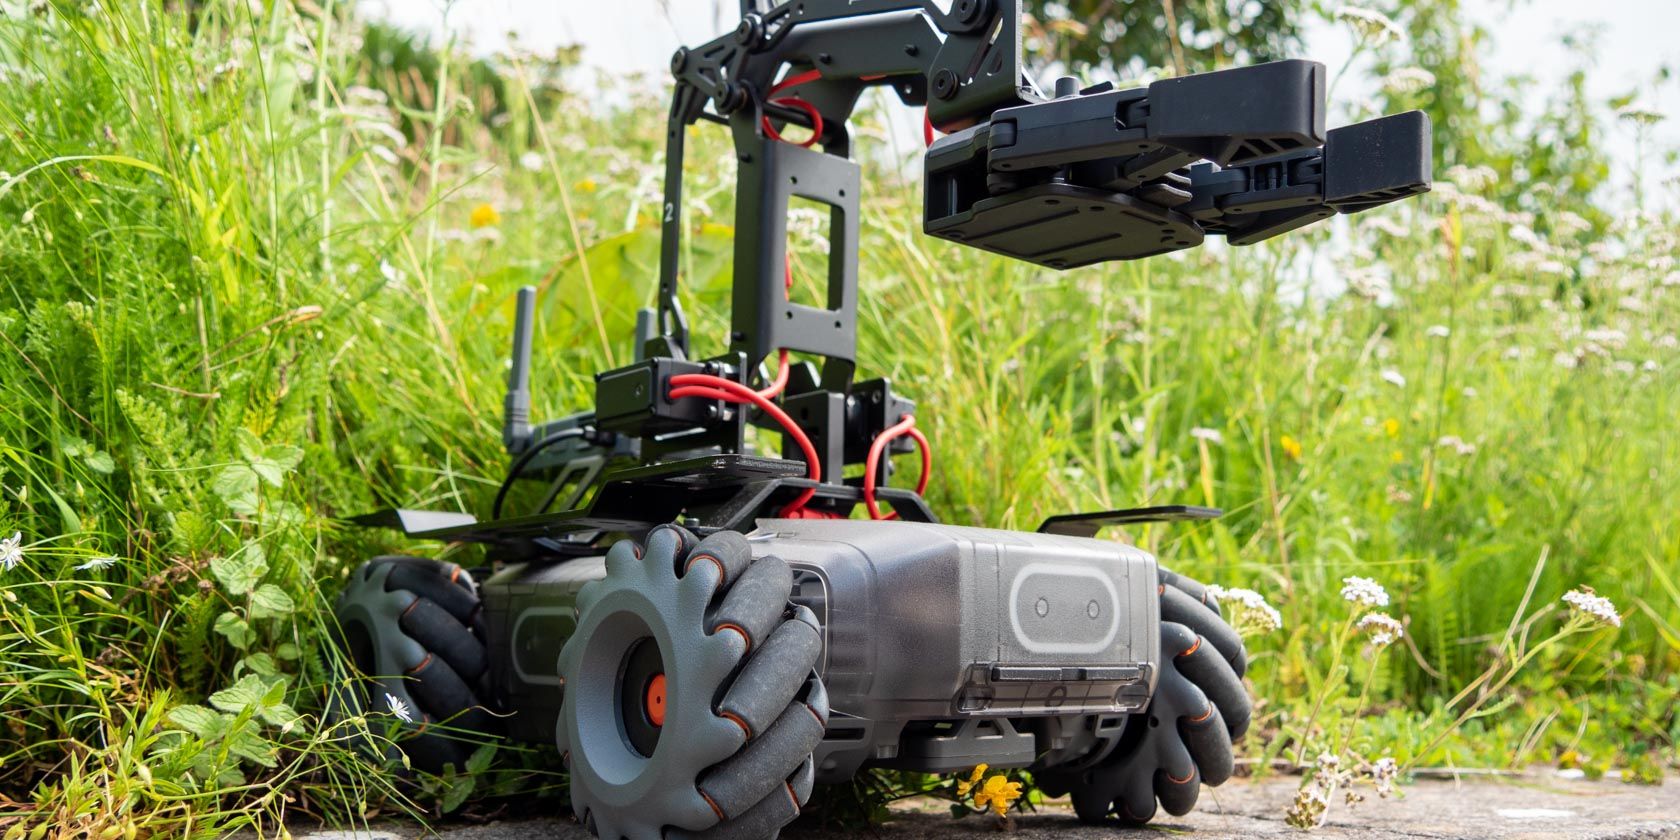
One outstanding feature of the Robomaster EP Core is the four Mecanum wheels. Each wheel is driven by its own powerful custom DJI servo.
Rather than a traditional rubber tire, these wheels has a set of twelve freely-rotating rollers, mounted at a 45-degree offset. Confused? I don’t blame you.
This curious arrangement of rollers on the wheel means that simply rotating the wheel actually forces it to move sideways instead. In order to create the normal forward or backward motion, you need another Mecanum wheel with its rollers mounted in the opposite direction. When both wheels are then rotated in the same direction, the sideways forces cancel each other out, and the chassis actually moves forward or backward as intended.
However, the magic comes when each wheel is driven in opposite directions, both creating the same sideways motion instead. With four such wheels mounted in this configuration, the Robomaster can both strafe left and right, and rotate 360-degrees on the spot. This is called omnidirectional movement. And it’s nothing short of amazing.
If you haven’t already watched the review video to see this in action, you really need to go do that now. Go on, I’ll wait.
This isn’t just incredible to watch though, it also opens up so many more programming possibilities for maneuvering because of the precision involved.
It also adds more interest to the remote control aspect. Maneuvering now requires two analog joysticks, rather than an accelerate and brake pedal, and steering wheel. Anyone familiar with first-person shooter games will feel at home immediately. You can strafe around a target in a circle, for instance, or easily drift around corners. The Robomaster EP Core is highly agile in tight spaces, and racing this thing is immensely fun.
Stop having fun though: this is a learning experience!
Grabber
Mounted on top of the chassis are the grabber attachment and grey controller box. The controller handles Wi-Fi communication, as well as the micro-SD card for recordings.
Powered by three strong servos, the grabber can lift up and down, push or pull, as well as pinch in or expand its rubber claws. Obviously the first thing I did was to grab a courgette and lug it around the kitchen for a while.
When fully extended, the lifting power of the servo is limited, so you may need to pull an object in closer before it can be lifted up again. It’s reasonably powerful and was able to lift up some small blocks of wood or toy cones, but struggled with an iPhone 6 Plus (which is about 6 ounces).
The Robomaster App
While a separate SDK is available and will likely be used for parts of the curriculum, your initial point of contact with the robot will be via the Robomaster app (for iOs, Android, Mac, or Windows). Launch this and you’ll be greeted with three choices:
- Solo
- Battle
- Lab
Solo mode is for simple remote control. Use the joystick on the left to move forward, backward, and strafe. Drag left or right on the screen to rotate. Click the grabber button to bring up that control interface. The main screen area is taken up by the wide-angle first-person-view from Robomaster’s camera. You can also record a number of audio clips to playback on the robot. These are saved to the hardware and can be recalled or set on a loop with hilarious consequences.
The button for follow mode sadly does nothing without the gimbal attached. To move the camera view up or down, you’ll need to manipulate the grabber arm that it’s attached to. The health bar also doesn’t do much unless you’re being pursued by a Robomaster S1 equipped with a laser gun (not even kidding–that’s a thing).
Battle mode is a more structured FPV combat or race event. Without the gimbal and gel bead or laser gun, the battle type aren’t relevant, but the race mode can still be used. By placing the included visual markers around your track, Robomasters must visit each marker in order, which behave as checkpoints. A bonus marker can also be hidden for extra points. The AI recognition system will immediately identify any it sees (though I found this only worked with good lighting), and after visiting each one in turn for the required number of laps, you’re given a resulting time.
Camera and FPV
Unsurprisingly for a company known to produce superb quality video drones, the FPV camera mounted on top of the grabber is also superb.
With an f2.4 aperture and wide 120-degree field of view, I found video transmission to be rock solid and perfectly clear, though this will depend largely on your router and Wi-Fi performance. You can record HD video to a micro-SD card too (not included), which includes audio.
Finally, the Lab is where you can learn all the Robomaster functions, as well as jump right into Python or Scratch coding. Road to Mastery consists of 11 guided Scratch tutorials. DIY Programming presents you with some ready-made Python or Scratch code examples or allows to start afresh. Robo Academy is really just three web links, taking you directly the developer documentation, video tutorials, and programming guide.
Again though, many of these resources rely on the gimbal attachment, so I wasn’t able to fully complete all of these with the EP Core. They’re still beneficial to run through however, and you may find you can convert many of the instructions for use with the grabber alone. The curriculum included with EP Core purchases will be tailored to the grabber.
Scratch Programming the Robomaster EP Core
Now taught to all school children from primary ages and up, Scratch is a visual block programming language that’s surprisingly powerful. The custom Robomaster GUI includes buttons to either bring up a first-person view (to drive the robot back tot he start position before running code again, for instance), and a debug overview of currently defined variables. As the robot runs through programs, blocks of code are highlighted, so it’s easy to follow along and see exactly what’s going on. You can even convert your Scratch program to Python code at any point if you’d rather.
I haven’t actually used Scratch before–the best I had in school was some a BBC Micro Turtle, with BASIC programming. I was pleasantly surprised at how easy it is to pick up, and how much of the Robomaster’s systems are exposed to graphical programming. The “Smart” block section includes things like action for when a visual marker is recognized in view, or when a number of claps are identified.
Robomaster S1 vs EP Core
Robomaster S1 was released last year and is available to purchase for all consumers. It features the same Mecanum wheeled chassis as the EP Core, but doesn’t have as any extensibility when it comes to additional power ports, sensor adaptors, or communications facilities for Arduino, micro:bit, or Raspberry Pi. It’s a more simple remote control and programmable robot, than an entire engineering platform.
The most noticeable difference is that the S1 featured a gel-bead and laser shooter mounted on a gimbal (“Warrior mode”), which could be used for Robomaster battles, or to shoot the included vision marker targets.
Instead, the EP Core instead uses a more education-focused (or school-friendly) grabber attachment, which DJI calls “Engineering mode”.
The EP Core also has a full curriculum for all suitable year groups to follow (though we haven’t had access to that so can’t comment further on it).
While many of the Robomaster app tutorials are currently reliant on having the gimbal attachment, the remote control element and programming components are all there for use with the grabber.
The other difference is pricing: Robomaster S1 can be purchased for around $500 from numerous stockists. The EP Core is only available through educational partners, or via direct inquiry to DJI. I couldn’t draw them on exact pricing (presumably there are bulk discounts for schools), but given the similarity to the S1, I wouldn’t have thought it was too far off the $500 mark.
Robomaster S1
Robomaster S1
Buy Now On Amazon $549.00
Is This the Ultimate STEAM Learning Tool?
In a word, yes.
The only slight frustration is that you can’t currently follow all of the Robomaster app tutorials. It’s not clear if these will be expanded to cover more of the grabber functionality, but the full curriculum will be tailored toward it and included with all purchases.
I’m quite envious of any lucky students who have the opportunity to learn to program using the EP Core. It’s simply an incredible learning tool. Sure you could learn Scratch without a cool robot to drive around, but it’s a whole lot more motivating to have that real hardware react to your programming. The EP Core model includes expansion ports and mounting holes for additional sensors and development boards, such as the Raspberry Pi, Arduino, or even NVIDIA’s Jetson Nano.
For pricing, you’ll need to enquire directly with DJI or via their local educational providers. Alternatively, if the expansion capabilities aren’t a concern and you’d rather the gimbal-mounted gel-bead and laser shooter instead of a grabber, check out the Robomaster S1, which is widely available.
Read the full article: The New DJI Robot is Insane: Introducing the Robomaster EP Core
The New DJI Robot is Insane: Introducing the Robomaster EP Core published first on http://droneseco.tumblr.com/
